An award winning diet diary to help you lose weight & keep it off
What is the Perfect Diet Tracker?
The Perfect Diet Tracker is an easy to use diet diary app designed to help you track your diet, lose weight and maintain your weight loss once you reach your target.
It’s both easy to use and it works on Mac, Windows and Linux computers!
Download the free trial
Click on a button below to download the free trial version now.
Our free trial is exactly that. Free.
Try the app for free with no forms to fill, we do not even ask for your name or email. As the diet tracker runs on your computer anything you enter into the diary remains private.
There are absolutely no restrictions in the trial. You will gain access to every feature found in the full version for 7 days. If you like what you see you can choose to make a one-time payment to buy the full version. There are no further subscriptions or the need for a ‘membership’.
Key features
 | Create a personal diet plan You can let the software suggest a personal diet plan based on your current weight and the goals you want to achieve or alternatively you enter your own custom diet plan. The diet tracker puts you in control. |
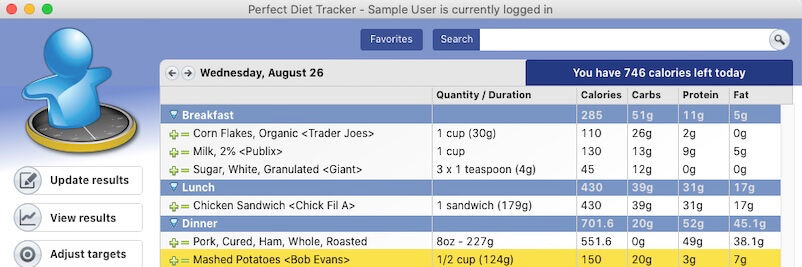
 | Track what you eat with the food diary Track your diet, adding items you eat or drink to the food diary. If the item you want to add is not already in the food database, the software can search the internet for product matches making adding items quick and easy. |
 | Let your computer do the hard work The app takes care of calorie counting and exercise tracking for you, monitoring your calorific and nutritional intake. Stay within the targets and you will achieve the weight loss you want. |
 | Multiple users? No problem and no extra charge. Each user can set a password so other users cannot see what you are eating, or currently weigh. |
 | Full international support The software can work in pounds or kilos, feet and inches or meters, you decide. The international food database contains products for countries throughout the world making adding products easy wherever you are. |
The Perfect Diet Tracker solution
The Perfect Diet Tracker is award winning diet software designed to help you lose weight & keep it off. It uses firm scientific foundations and proven calorie counting methods. The software has an easy to use, intuitive interface and an extensive international food and exercise database. It is simple, affordable and safe.
You can use the suggestions provided by the software based on your specific user profile or follow your own diet plan. Through the diary and extensive food database, you quickly learn which foods affect your diet the most and how you can take control of your own weight management.
What will I be able to eat?
You decide!
Obviously if you try to enter a diet made up entirely of chocolate you will find the calorie counter quickly turns ‘red’ and your nutritional profile does not come close to the target, however we are not saying you need to eat a diet consisting of ‘rabbit food’ either. The key is finding a balance you can live with, a diet that is both good for you and one you can maintain.
The Perfect Diet Tracker software provides an easy way to find this balance with full and free access to calorific and nutritional data helping you find your ‘perfect diet’.
Will the diet work for me?
The diet calculations used by the Perfect Diet Tracker work for the vast majority of people.
The two groups of users the calculations do not work for are extreme athletes and those users with a very high body mass index (‘morbidly obese, category III’). In these cases, the software can still track your diet however it will be unable to suggest a daily calorific allowance. If you fall into either group you should consult your doctor to discuss a suitable calorific allowance and nutritional profile and enter these manually, the software can then be used as a calorie counter and diet planner.
What makes the Perfect Diet Tracker better than other solutions?
We believe the Perfect Diet Tracker is the easiest to use diet tracking solution currently available.
There are no ongoing subscriptions and a fully functional free trial version with no registration requirements so you can fully try the software before considering buying.
The bottom line is the Perfect Diet Tracker is based on solid scientific calculations and methods ensuring you lose weight safely and effectively. Why not try it today?